A simple burglar Alarm: Ethernet shield connection

Hello again. I received ad home the Ethernet shield and it’s time to study it a bit!
What I want to understand is how to send an email to my email address .

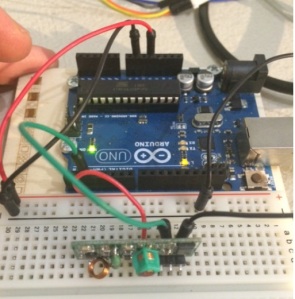
The connection to the Arduino UNO is simple , a picture can explain better!

FZ05SN7H05NT26I.MEDIUM(from instructables.com)

We can connect the RJ45 socket to our router and the plug line to usb port (see below).

FDP0VOXH05NHCWO.MEDIUM(from instructables.com)

The most important things to keep in mind are:

  1. ethernet shield ip settings
  2. ethernet shield mac address
  3. SMTP settings to send email

My router is in DHCP so it dynamically set the IP address.
No problems for the MAC address: it can be set as you need.

There are two ways to send email with Ethernet Shield:

  1. Temboo service has a library to send email with gmail account (instruction here )
  2. SMTP2GO service to send up to 10 email with its SMTP free service (here you can register )

I choose SMTP2GO cause I discovered Temboo too late, when I finished to deploy with SMTP2GO.
If someone use Temboo let me know your opinion.

I used Nicolaj Joergensen code,it’s very clear and well explained.

#include <SPI.h>;
#include <Ethernet.h>;

// Arduino network information
byte mac[] = {  0x00, 0xAA, 0xBB, 0xCC, 0xDE, 0x02 };
EthernetClient client;
char smtpServer[] = "smtpcorp.com";
void setup()
{
  Serial.begin(9600);  // for debug mode
  setupComm();
}
void loop()
{
  email("hallo");
  delay(1000);
}
//  ethernet shield connection init
void setupComm()
{
  Serial.println("Trying to connect");
  if (!Ethernet.begin(mac)){
    Serial.println("Failed to DHCP");
    // verifyng connection
    while(true);
  }
  delay(10000);
  // IP address is:
  Serial.print("IP address: ");
  for (byte thisByte = 0; thisByte < 4; thisByte++) {
    Serial.print(Ethernet.localIP()[thisByte], DEC);
    Serial.print(".");
  }
  Serial.println();
}
// now I send email
bool email(char* text)
{
  bool success = false;
  Serial.println("Sending email...");
  if (client.connect(smtpServer, 2525)){            //2525 is SMTP Server port
    Serial.println("connected");
    delay(100);
    client.println("EHLO arduino");
    for(int i=0; i<999; ++i){
      if(client.read() > 0)
        break;
    }
    Serial.println("responded");
    client.println("AUTH LOGIN");                     //see "http://base64-encoder-online.waraxe.us/"
    client.println("xxxxxxxxxx");           		 //Type your username  and encode it
    client.println("yyyyyyyyyy");        			//Type your password  and encode it</p>
    // Put your "from" email address here
    client.println("MAIL FROM:<dumm@gmail.com>"); //Seems you can write what you want here...
    for(int i=0; i<999; ++i){
      if(client.read() > 0)
        break;
    }
    client.println("RCPT TO:<mail@mail.com>");
    for(int i=0; i<999; ++i){
      if(client.read() > 0)
        break;
    }
    client.println("DATA");
    for(int i=0; i<999; ++i){
      if(client.read() > 0)
        break;
    }
    //Sender
    client.println("from: mail@mail.com"); //Sender address
    client.println("to: mail@mail.com");  //Receiver address
    client.println("SUBJECT: From your arduino");
    client.println("");
    client.println(text);
    client.println(".");
    client.println("QUIT");
    for (int i = 0; i<999; ++i){
      if(i > 998){
        Serial.println("error: No response");
      }
      if(client.read() > 0)
        break;
    }
    success = true;
    client.println();
    Serial.println("end");
  }
  else {
    Serial.println("Failed");
    client.println("QUIT"); //Disconnection
  }
  client.stop();
  return success;
}

Code explanation:

line  5: MAC Address setting: as told before you can choose the numerbs you want!
line  7:  SMTP server address (is smtpcorp.com for the SMTP2GO service)
line 15: email function: we send an email with “ciao” as text message.
line 22: ethernet shield initialization
line 30-33: here we display the IP address assigned in DHCP by my router. It’s really help know Ethernet shield address expecially if you want to use our shield as webserver.
line 42: SMTP command to send email.
line 51: 64 base encode for SMTP2GO username
line 52: 64 base encode for SMTP2GO password.

This link can be useful for encoding in 64 base: http://base64-encoder-online.waraxe.us/
For example CICCIO username will be Q0lDQ0lP in 64 base.

I uploaded the sketch on Arduino UNO and i received my first email!
At line 16 I set a delay, every 1 second Arduino will try to send an email!
Be careful cause SMTP2GO service provides up to 10 daily emails in the free edition.

It’s all for today with ethernet shield: i have all I want.

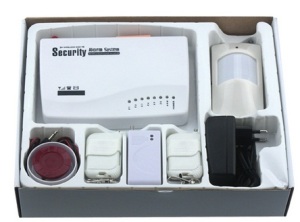
The next steps is to send a custom email when one sensor will detect an intrusion: I want to know witch sensor and at what time.

See you soon!

Ps. Meanwhile I received Arduino Nano!… 🙂 🙂

A simple burglar Alarm: the noise sensor

The noise sensor FC04 is really easy to use.
It only has 3 pins: Vcc, GND e SNG, therefore the connections I have established are the followings:

Pin Receiver Pin Arduino
Vcc 5 V
GND GND
SNG Pin 2 (digital)

The sensor has a noise threshold set by a screw: if a noise  over the threshold is detected, a HIGH signal is sent to the selected pin (2 in our case).

Therefore the sketch can be:


int SERIAL_BAUD        = 9600;
int SENSOR_DIGITAL_PIN =    2;
int SOUND_DELAY        =   50; /* a small delay to not detect multiple noises or echos */
void setup() {
    Serial.begin(SERIAL_BAUD);
    pinMode(SERIAL_BAUD, INPUT);
}
void loop() {
    if (digitalRead(SENSOR_DIGITAL_PIN) == LOW) {
        Serial.print("Rumore!");
        delay(SOUND_DELAY);
    }
}

Now we can merge together the two programs (movement and noise sensor) to make Arduino send me an email in case of suspected intrusion.

I’ll work on internet shield in the next post: as always done i’ll try to understand how it works itself  and then add it with the noise sensor above and the movement sensor previously published .

A presto!

A simple burglar Alarm: reading data sensors

I found really useful  rc -switch library to read sensor data.

First of all i wanted to understand what happens  when I activate the door sensor or PIR sensor.
I connected the receiver to Arduino as the table below:

Pin Receiver Pin Arduino
Vcc 5 V
GND GND
DATA Pin 2 (digital)

I used the breadboard included in the arduino starter kit. 


I included the rc switch  library and copied it in Arduino library folder.
My filesystem under libraries\RCswitch\ look like:

  • keywords.txt
  • RCSwitch.cpp
  • RCSwitch.h
  • example folder

We can open Arduino Ide and copy and paste this code:


#include <RCSwitch.h>;
RCSwitch mySwitch = RCSwitch();

void setup() {
   Serial.begin(9600);
   mySwitch.enableReceive(0); // Receiver on inerrupt 0 =&gt; that is pin #2
}

void loop() {
   if (mySwitch.available()) {

      int value = mySwitch.getReceivedValue();

      if (value == 0) {
         Serial.print("Unknown encoding");
     } else {
         Serial.print("Received ");
         Serial.print( mySwitch.getReceivedValue() );
         Serial.print(" / ");
         Serial.print( mySwitch.getReceivedBitlength() );
         Serial.print("bit ");
         Serial.print("Protocol: ");
         Serial.println( mySwitch.getReceivedProtocol() );
      }

      mySwitch.resetAvailable();
   }
}

Uploading sketch to Arduino  and opening console monitor on 9600 baud I can read this values:

  1. door sensor 1: Received 1398111 / 24bit Protocol: 1
  2. door sensor 2: Received 1394004 / 24bit Protocol: 1
  3. PIR sensor      :Received 1392102 / 24bit Protocol: 1

At this point I can use these values ​​to intercept door opening or movements into house and  make Arduino send me an email or a text message.
I opted to receive an email: here comes ethernet shield .

An idea: a simple burglar Alarm

About a year ago I bought a typical Chinese burglar on Ebay, it’s composed of a control unit, a PIR ( passive infrared sensor) and two door sensors.

It is completely wireless and works on 433 Mhz frequency.

After a week the unit no longer works !!!

At this point I only had the sensor, what to do ?!
I want to try to use Arduino to read data coming from the sensors and to build a simple burglar.

My idea is :

– interfacing sensors with Arduino;
– add a noise sensor to detect any suspicious noises at home;
– send an e-mail to my email address in case of suspicious activity (like noise or movement)
– turn on a camera to see what is happening in the house

This is my first project with Arduino and I do not know excessively  about electronics, but I do know programming.

First I bought an Arduino UNO, then I searched for a receiver / transmitter 433 Mhz …..

For wireless communication I found these models :

MX05V and MXFS03V

As sensor noise :

FC04

Both are available on ebay (very cheap but with waiting time of about a month in Italy ) .

At this point it was time to connect the sensors to Arduino and understand how to read the data .

Hi to everyone

Hello everyone,

Let me introduce myself, my name is Giuseppe.
I’m a NET  programmer with the following interests: running, cycling and sports in general .
And now let’s talk about Arduino : I discovered a new world of passion and imagination.
This world is completely new to me, but I want to try it and write my “successes” and my failures .

I hope to receive suggestions and reviews from you.
For me it’s important to improve  and learn.